As you advance in your ukulele lessons you will learn different techniques to achieve different sounds from your instrument. Ukulele fingerpicking is an important component if you want to boost your playing skills and take your music to the next level. Here, ukulele teacher Willy M. teaches you ukulele fingerpicking basics…
A lot of people like to strum the ukulele, but they usually stop there and never explore all of the ways to fingerpick the ukulele. Typically, I deal with people who come to the ukulele through other instruments, like the guitar. But regardless of your level and experience, we’re going to go over ukulele fingerpicking basics. I’ll also give you some tips on how to learn to control each finger, and provide some examples of ukulele fingerpicking patterns, ukulele fingerpicking songs, and even some ukulele fingerpicking tabs.
- Ukulele Fingerpicking Basics
- How to Control Your Fingers
- Ukulele Fingerpicking Patterns
- Chord Forms
- Ukulele Fingerpicking Songs
Ukulele Fingerpicking Basics
The most basic form of ukulele fingerpicking is thumb-style picking. Very basic fingerstyle starts with learning how to use your thumb to pick the strings of the ukulele.
You may be used to thumb strumming, and fingerpicking with the thumb is not much different. The main difference is that instead of strumming all of the strings, you use your thumb to strike particular strings.
You could strike the strings in a random order, but that would not necessarily be very musical. Here are a couple patterns that you might want to practice. You don’t even have to hold down any chords at first.
We are going to use the bottom three strings (G – C and E) which spell out the C major chord. These three strings will give us our drone that we can create with our picking pattern.
Try these patterns using only your thumb:
1. Quarter Note Arpeggio
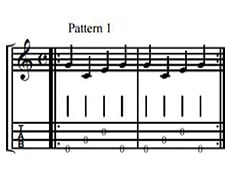
G C E G, G C E G
Once you’re familiar with this pattern, try working through some of the chords that you know, but keep plucking these strings as you change chords.
2. Full Ukulele Arpeggio
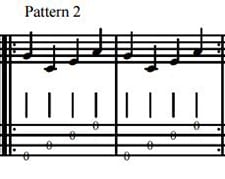
G C E A, G C E A
Again, start with just the open ukulele, but then work on changing chords as you go.
3. Quarter Note – Eighth-Note Mix
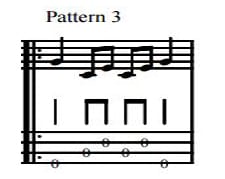
C E C E
Start with a quarter note on the G, and then play eighth notes for beats 2 and 3 on the C and E strings a couple times, and then come back to the G string. It looks like this: G (quarter) C E C E (eight notes) G. Repeat as often as necessary.
Once you master these patterns with your thumb, you can go on to trying them with your other fingers. I would recommend trying each pattern with each finger. When you get these patterns down with all four fingers, then them again with the two, three and four finger styles.
How to Control Your Fingers
Two-Finger Style
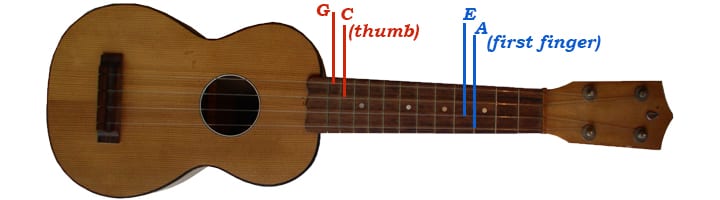
Let’s take a look at what pattern 1 would look like with two-finger style. First, your thumb will control the G and C strings, while your first finger controls the E and A strings. Pattern 1 would look like this: G (thumb), C (thumb), E (first finger), G (thumb). Repeat as often as necessary.
In two-finger style, you can also use your thumb to control the first three strings, and control the top string with your first finger. Pattern two would look like this: G (thumb), C (thumb), E (thumb), A (first finger), repeat.
You can alternate between the thumb and the first finger, to get a Spanish guitar sound: G A, C A, E A, A A. Check out the example in the tab. The first finger controls the A string here as well, so the mechanics are thumb, finger, thumb, finger (over and over).
Three-Finger Style

Three-finger style can be a bit tricky if you’re just learning how to finger pick. The best way to do this is to mimic a banjo fingerpicking pattern, a la the bluegrass legend Earl Scruggs. Scruggs often used his thumb to go back and forth between the high string and the low string of the five-string banjo.
You can do the same by using your thumb to alternate back and forth between the G and the C strings. Your first finger controls the E string, and the middle finger controls the A string. Go back through the ukulele fingerpicking patterns and try to use this fingering.
Four-Finger Style
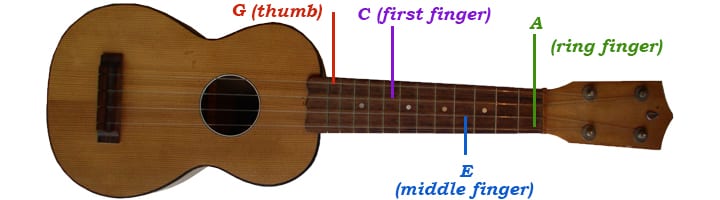
Four-finger style is similar to three finger, except each string is governed by a different finger. The G (thumb) C(first finger) E(middle finger) and A(ring finger). This style is not one that I use often, but it’s worth practicing. You can achieve some nice rolls if you can get the rhythm in uniform.
Once you’ve mastered these styles and figured out which ones works best for you, give these ukulele picking patterns a try.
Ukulele Fingerpicking Patterns
Forward Banjo Roll

G E A, C E A
Use a triplet on each of these notes to give it a banjo-roll feel.
Reverse Banjo Roll

A E C, A E G
Same as the above, but backwards
Forward-Reverse Roll
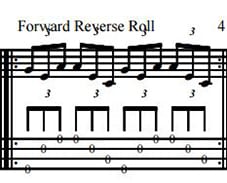
G E A, A E C
Use the same technique as the first two rolls, only reverse directions when you get to the top.
Reverse Four-Finger Roll
A E C G, A E C G.
Chord Forms
Once you master the basics of these picking patterns and rolls, you should learn how to change chords while you finger pick. I recommend starting with simple chord changes. Go from the C chord to the G chord, back and forth several times, until you have it mastered.
When you’re comfortable with these changes, start going from the C to the F to the G, and back. Once you’ve got that down, start working on popular chord progressions that you know. Start with a simple blues progression: I, IV, V (C F and G in this case) progression, or a country progression: I, IV, V. After that, work up to an oldies progression: I, vi, IV and V (C Am F and G in this case).
Once you’ve mastered some of the popular chord progressions, take a stab at playing your patterns over different versions of the chords that you know. Try to finger pick over a C chord, moving to a C2 chord, and then to a Csus4 chord. This will give you a lot of practice that will serve you well in any style of playing.
Ukulele Fingerpicking Songs
There are a lot of songs that you can start fingerpicking on the ukulele. One of the first songs I learned to fingerpick was “Vincent” by Don McLean. I also learned a lot of good fingerpicking technique by working through several songs by the Eagles. “Hotel California” was probably the first Eagles song I learned, followed by “Desperado” and “Peaceful, Easy Feeling.” I also recommend songs like “Don’t Think Twice, It’s Alright” by Bob Dylan, and “Sounds of Silence” or “Kathy’s Song” by Simon and Garfunkel.
I’ve included links to find all of the chords for these songs, plus if you want to print any of the ukulele fingerpicking tabs I mention above, you can download them here!
So there’s a lot of information that should help you get started fingerpicking on the ukulele! I hope you practice a lot, and get better and better. Remember, if you have questions or need any help, make sure to ask your ukulele teacher.
Don’t have a ukulele teacher? Find a private instructor near you!
 Post Author: Willy M.
Willy M. teaches guitar, ukulele, and mandolin lessons in Winston Salem, NC. He’s the author of the Dead Man’s Tuning series of mandolin songbooks, and is a former member of the American Federation of Musicians. Willy has been teaching for 20 years, and his students have ranged in age from young children to folks in their 80s. Learn more about Willy here!

The post The Beginner’s Guide to Ukulele Fingerpicking appeared first on | TakeLessons.